In mechanic engineering, machining tolerance refers to the amount of unplanned deviation between the nominal dimension and real dimension.
All kinds of tolerances are affected by the presence of various reasons such as position error, incorrect relative rotation between workpiece and cutting tools, deformation caused by compression of cutting force, or even stress relief in interior of the component, etc. Tolerance will impact on assembly and properties of parts more or less. Thus, tolerances(form, position, dimension, and surface roughness) are quite essential to mechanic engineer when design parts.
Considering the limited space and precious time you would cost for this article, herein we’d merely discuss the dimension tolerance of two classic geometry features, which are shaft and holes.
Main Difference between Dimension Tolerance and Allowance
Dimension tolerance is related to the intermediate deviation between two components. Contrary to allowance, tolerance tends to be referred to as a sort of deviation that is not planned. For instance, when a cold forming bar’s dimension tolerance is 0/-0.15mm, we will preset 0/-0.02mm as the allowance for this part cause it will shrink by 0.13mm in subsequent annealing process. As you can see from this example, allowance is predicted by the engineer’s knowledge and judgment, while tolerance is just the critical boundaries acceptable for a processed part.
Factors Making up Dimension Machining Tolerance
The above example also mentioned limit deviation, comprising upper deviation and lower deviation. In 0/-0.15mm, “0” is regarded as upper deviation(marked as ES) which means the difference between the maximum limit of size and actual size. Contrarily, “-0.15mm” refers to the lower deviation(marked as EI), the difference between the minimum limit of size and actual size.
Basic Size
This is the nominal diameter of the shaft and the hole.
Lower Deviation
This is the difference between the component’s minimum limit size and basic size.
Upper Deviation
This is the difference between the component’s maximum limit size and basic size.
Dimension tolerance is equal to the difference of absolute value between upper deviation and lower deviation, expressed by the following formula,
T=丨ES-EI丨
Why dimension tolerance can’t be negative value is because deviation is allowed to be more or less than the basic size of the component, while Tol. Is not. To some degree, machining tolerance is the reflection of how difficult a process is.
3 Types of Fits of Hole&shaft System
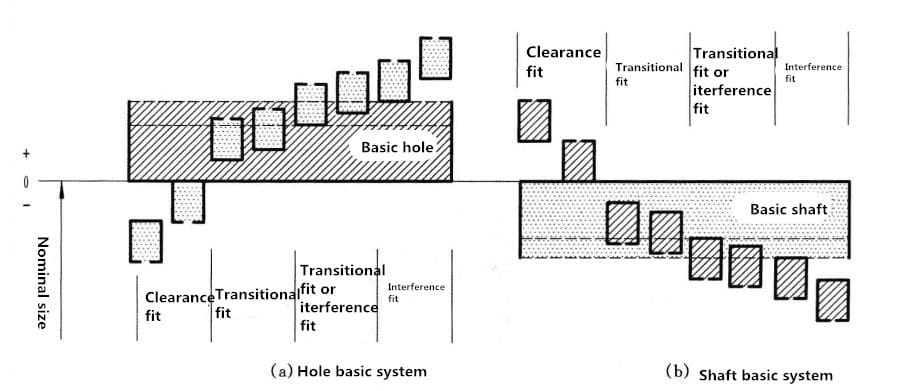
Before we move forward to what is shaft basic or hole basic system, there is a need to review the concepts of interference and clearance. each manifests a kind of relationship between hole’s and shaft’s tolerance zone. In general, interference corresponds to tightness and clearance correspond to looseness.
When a hole and a shaft are in clearance fit, the hole’s tolerance zone is bigger than the shaft’s. Clearance fit is commonly used in a looser joint link for the H&S system.
Interference fit means the hole’s tolerance zone could be smaller than the shaft’s. Obviously, this kind of fit is suitable for those tight joint links.
Therefore, we will readily understand that transition fit is an in-between fit condition between interference and clearance.
Standard Machining Tolerances and its Principle of Selection
When it comes to the two basic systems, there is another critical concept need to be mentioned, standard tolerance levels. (marked as IT) Each IT level corresponds to a standardized tolerance amount that is calculated up by the following formulas,
i—— Standard tolerance factor, taking micron as a unit;
D—— The geometric average of the Min. and Max. dimensions in a size section, whose unit is millimeter.
Size of workpiece≤500mm,
i=0.453√D+0.001D
500mm<Size of workpiece≤3150mm,
i=0.004D+2.1
Then we are able to obtain the following chart about different Tol.s values. Literally, they are products multiplying a coefficient by i, the standard tolerance factor. Although many solution procedures are omitted here.
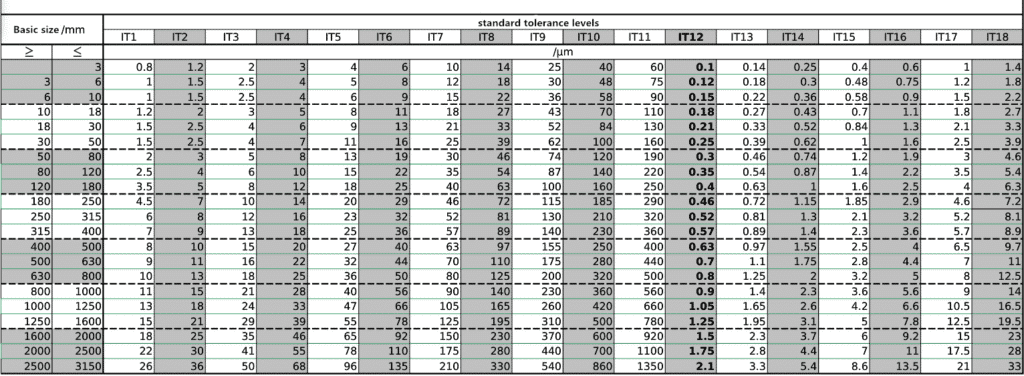
As this chart shows, standard tolerances are divided into IT01, IT0, IT1,.. and T18. the levels increase, and the tolerance’s value increases accordingly.
Principle of selecting appropriate tolerance level is taking account of economic effectiveness, manufacturing cost, and use the value of machine parts. Generally, IT5~IT13 is applied for the condition under general fit, IT2~IT5 for ultra-precision parts, IT12~IT18 for status without any fit and IT8~IT14 for raw materials’ fit.
Besides, according to international standards, IT14-IT18 are unavailable when the basic size of parts is less than 1 mm.
Hole&shaft Basic System and the Selection of Their Machining Tolerances
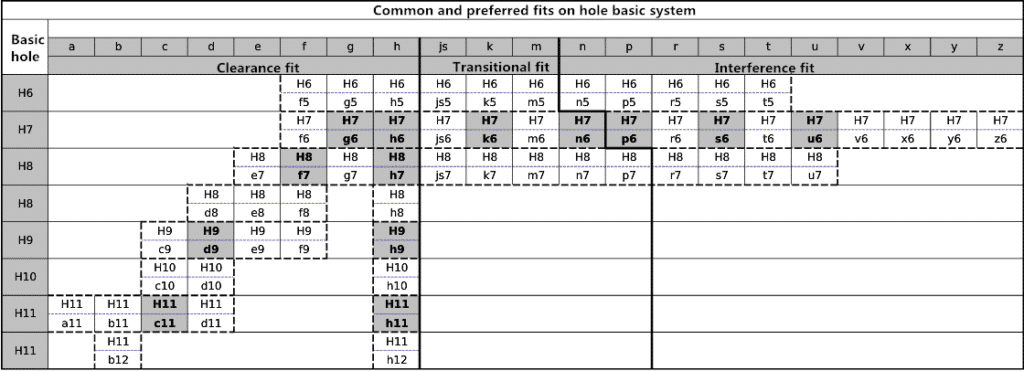
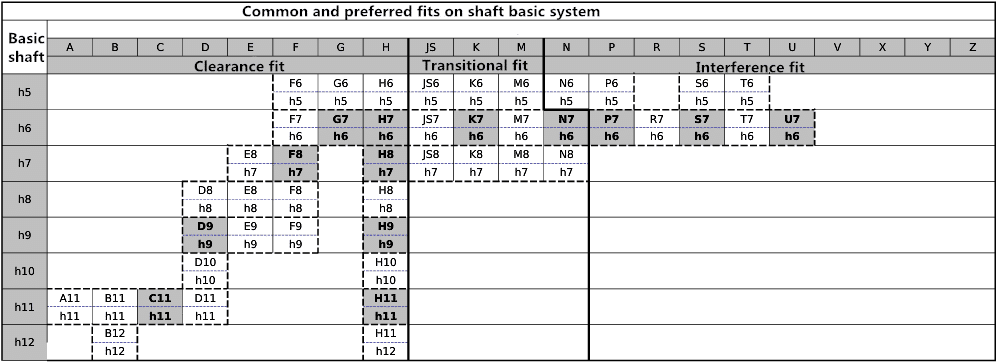
Back to our primary concern, applying IT levels in tolerances of shaft&hole’s fits, we label the hole’s tolerance zone as “Hx” and shaft’ as “hx”. There are the charts for your reference to look through how to what standard tolerance is selected correctly based on the three kinds of fits and shaft&hole basic systems.
